
GOALS/OBJECTIVES
- Present information on the value of communication.
- Present information on radio waves to understand the abilities and limitations of the radio.
- Present information important to improving reception of radio signals.
- Recommendation for another antenna along with additional items required to improve reception.
- Learn to set the functions/features of the Tecsun PL880.
- Clarify instructions and correct some errors in the supplied Operations Manual. 7. Present some hidden features of the radio.
VALUE OF COMMUNICATION
During a time of natural, man-made, or even supernatural adversity, men and women are concerned about family, friends, and others. It is only human to desire to know about another’s well-being. In today’s world, many of those we are concerned about are spread out across the nation, if not the world. Assistance always begins with total and complete acknowledgement and trust in God. Always. We need to trust that everyone we are concerned about, God is concerned about even more. As God aided the Israelites of old, He can and will aid us now. The aid needed will involve the gift of you. You may be helping someone’s loved one, across the country, that they are concerned about. Help comes in many ways, but it is never selfish on our part if it is rooted in God.
To assist you in learning of others well-being, if usual means of communication breakdown, CORAC will be communicating information over shortwave amateur radio frequencies. None of us fully knows what that may look like. Yet, CORAC is prudently preparing to help. We strive to “be a sign of hope for others”. If you are like many, you have never or rarely used a shortwave radio receiver in the past. This document hopes to educate you on operating the Tecsun PL880 shortwave radio receiver. Although God created radio waves and we make use of them, he communicated directly with mankind in the Old and New Testaments. Let us not forget.
ABILITIES AND LIMITATIONS OF THE RADIO
During the late 19th and early 20th centuries, radio waves were discovered. The radio spectrum of the electromagnetic spectrum was divided up by their discovered wavelengths: Long Wave (LW), Medium Wave (MW) and Shortwave (SW). As time progressed other radio waves were discovered, yet they kept the historical terms and jointly added additional terms to better classify the waves by frequency.

Why is this important? AM radio waves (think of your car’s radio) travel on LW in Europe, Asia, and Africa and on MW in North America, for the most part. So, what travels on SW? Amateur radio waves known as High Frequency (HF) waves. The Tecsun PL880 has the capability to pick up SW radio signals, along with AM and FM signals. THIS INFO HELPS TO UNDERSTAND PROGRAMMING THE RADIO. Of course, this has probably oversimplified radio waves, but it can shorten your learning curve with a basic understanding.
Various natural events and man-made items can interfere with radio wave reception including SW. Natural events include: the sun (sunspots and/or coronal mass ejections), atmosphere, and weather to name a few. Man-made items include powerlines, EMPs, consumer electronics, and buildings to name many.
IMPROVING RADIO WAVE RECEPTION
The simplest way to improve reception of radio signals is to avoid man-made items that interfere with reception. Avoid being near powerlines and consumer electronics as best as possible. Consumer electronics include cell phones, stereos, TVs, light bulbs, microwaves, etc. Any device that uses electromagnetic frequencies can interfere with radio frequencies.
AM BAND
To improve reception of the AM band, simply rotate the body of the radio to align with the transmitted AM radio signal. When the internal AM antenna (called a ferrite bar) is aligned properly, the audio output will sound better.
FW BAND
To improve reception of the FM band, simply extend the external telescopic antenna and rotate the antenna to align with the transmitted FM radio signal. I recommend rotating the antenna at its base to prevent bending or breaking the antenna. When aligned properly, the audio output will sound better.
SW BAND
To improve reception of SW BANDS (aka HF BANDs), plug the SW antenna (a 15.6 ft. black wire) into the correct socket on the left side of the radio. Extend the antenna as long as possible. You can attach the clip of the SW antenna holder to a curtain rod, curtain, or tree. Be sure the antenna is still attached to the holder; you may need to apply a small piece of electrical tape to keep it attached. Attempt to orient the wire perpendicular to the direction of the SW radio signal. CORAC’s primary locations for the broadcast net are in Georgia, Texas, and California. If you are located North of Georgia, the antenna should be oriented horizontally in a West to East direction. Three colored examples are below: red radio signal with red antenna orientation, blue with blue and green with green. Notice how orientation must change for antenna to pick up the radio signal. The location of the transmitted signal determines the antenna orientation. By nature, SW radio signals are difficult to hear. However, they can be heard. Bandwidth selection can improve the sound.

ANTENNAS TO IMPROVE RECEPTION ALONG WITH RECOMMENDED ADAPTER
The Communications Team provides information on how to make a dipole antenna here:
You might want to simply buy an antenna. Choose one of the three listed below along with the cable, adapter and carabiner clips.

Dipole antenna that is already made. Covers the 20M band that CORAC will be transmitting on. SO239 female socket connector.

Dipole antenna that is already made. Covers the 40/20M bands that CORAC will/may be transmitting on. SO239 female socket connector. Accepts a PL239 male plug. More info >

Dipole antenna that is already made. Covers the 80/40/20 M bands that CORAC will/may be transmitting on. The antenna connector is a SO239, a female adapter, for a male PL259 plug. More info >

RG58 coax cable used for HAM radio reception. Get the shortest length you need. Cable has PL239 male plugs that fit into SO239 female sockets. Cable connecting the antenna to the radio adapter below. More info >

Adapter to connect the radio to the coax cable. More info >

1 clip suspends the body of the antenna and two to attach to the insulators or wire loops. Use a small piece of rope to tie through the insulators/loops to secure the clips. Secure the rope with the clips to a stake or branch. Carabiner clips May be found at any camping dept. of a store. Or order online.
SETTING THE FUNCTIONS/FEATURES OF THE RADIO
There are two ways to access the functions of the buttons on the keypad:
- When the radio is turned off (POWER OFF), includes clock and system settings.
- When the radio is turned on (POWER ON), includes scanning, programming frequencies and stations into memory, and removing from memory various frequencies and stations. This is accomplished three ways: 1) manually tuning the dial to a frequency or station, 2) scanning for a frequency or station, and 3) direct keypad entry.
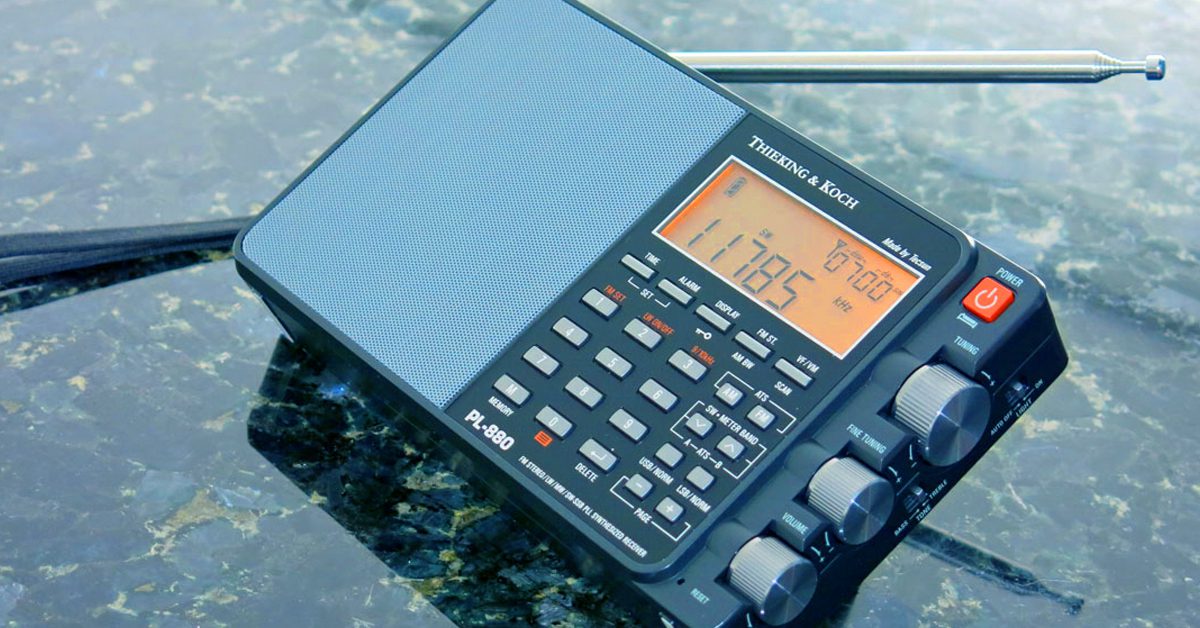
The radio’s LCD display panel symbols and keypad are pictured below.
Be sure to look at page 5 in the Operations Manual for the symbol descriptions.
ETM in the lower right corner of the display is not used on this radio.
The display/skeleton key button works in the POWER OFF or POWER ON position.
Pressing the button once lights up the display panel.
(Pressing any button on the keypad will cause the display panel light to turn on.)
Pressing and holding the display/skeleton key button for 1 second locks or unlocks the keypad.

RADIO POWER OFF FUNCTIONS
CLOCK/TIME
- Time is designated as 24 hour aka military time.
- Press the time button for one second. Hours position flashes.
- Rotate the course tuning dial or input numbers to desired hour.
- Press the time button again. Minutes position flashes.
- Rotate course tuning dial or input numbers again to desired minutes.
- Press the time button again.
- Time is set.
ALARM
- Alarm time is designated as 24 hour, aka military time, in upper right corner of display panel.
- Press the alarm button for one second. Hours position flashes.
- Rotate the course tuning dial or input numbers to desired hour.
- Press the alarm button again. Minutes position flashes.
- Rotate course tuning dial or input numbers again to desired minutes.
- Press the alarm button again and rotate the course tuning dial to set the Alarm Off Timer from 1 to 90 minutes for desired time.
- Press Alarm again, your alarm time and alarm off timer are set.
- To activate alarm, press alarm button and the “speaker alarm” icon displays.
- To deactivate alarm, press alarm button and the “speaker alarm” icon disappears.
SLEEP TIMER
- Press and hold the POWER button until the “sleep timer” icon displays.
- Rotate course tuning dial to desired sleep time, from 1 to 120 minutes or to the ON position.
- This is activated by pressing the SNOOZE button on top of the radio.
SYSTEM SETTINGS (Orange markings)
- FM SET Different parts of the world use a different setting for the lower end of the FM frequency band.
- The lower end of the FM frequency band in America is 88 MHz.
- So, the FM band in America transmits between 88 MHz and 108 MHz.
- Press the number 1 (FM SET): the lower end of your frequency band can be set to 64, 76, 87 or 88 MHz by pressing and releasing the button to cycle through the choices.
- Set to 88 MHz in America.
- The upper end of the frequency band is automatically set to 108MHz.
LW ON/OFF
- The AM band is made up of Medium Wave (MW) frequencies (@500 kHz to 1700 kHz) or Long Wave (LW) (@150 kHz to 300 kHz) frequencies.
- This button turns reception of LW frequencies ON or OFF.
- Just press the number 2 (LW ON/OFF) and hold until ON or OFF is displayed.
- The term displayed is the setting, so now release the button.
- Do so a second time if you wanted the other option.
- Usually this is turned OFF in North America. 9/10kHz Different parts of the world tune the AM band in different increments. North America tunes in 10 kHz increments while Europe, Asia, and Africa tune in 9 kHz increments.
- Press the number 3 (9/10KhZ) for 2 seconds and either the 9 or 10kHz increments will be set.
- Do so a second time if you want the other option.
AUTO-SORTING STATION LIST
- This automatically sorts stored station memories.
- Press the number 0 for 2 seconds and the memory page in the upper right side of the display panel starts running. This function will remove duplicate stations and auto-sort all stored stations from low to high frequency and in sequence of FM, SW, (AM) MW, and LW.
RADIO POWER ON FUNCTIONS
Include VF/VM scan, tuning frequencies, storing frequencies into memory, listening to stored frequencies, and deleting stored frequencies.
VF/VM SCAN
- Press this button to View Frequency (VF) on the display.
- If the frequency displays twice, you are in VF mode.
- Press this button to View Memory (VM) of preset stations or frequencies stored in memory.
- If the station memory, in the upper right of the display panel, flashes 3 times, you are in VM mode.
- Once you have chosen VF or VM, press the button for 1 second and release.
- The radio will scan frequencies if in VF mode or the presets in memory if in VM mode.
- Press the button once to stop scanning. This works in FM, AM, or SW frequencies and memories.
- Before the radio has any stations or frequencies stored into memory, you cannot switch between VF/VM mode, the radio will automatically be in VF mode.
TUNING FREQUENCIES OR STATIONS
There are 3 ways to tune in desired frequencies or stations.
- MANUAL TUNING. Turn the course and/or fine-tuning dials to make your selection.
- AUTO BROWSE. Manual refers to this as SEMI-AUTO. While in VF mode, press and hold the VF/VM button for 1 second. The double arrowhead symbol flashes indicating it is scanning for frequencies or stations, staying on each for 5 seconds before proceeding. Press any button on the keypad to stop scanning.
- DIRECT KEYPAD ENTRY. While in VF mode, press the numbered buttons to directly enter in a frequency or station. Ignore the decimal point when inputting numbers. If the frequency is not within the covering range, the error symbol “ERR” will be displayed.
STORING MEMORIES
I recommend going outside away from buildings and overhead powerlines, if possible, for the best access to available stations and frequencies in your area.
MANUAL STORAGE
- Enter VF mode, select FM, AM, or SW button for band selection.
- Dial to or input the numbers of a station desired.
- Press the MEMORY button, PRESET will flash in upper right corner of display panel.
- Rotate course tuning dial to select a memory address of where to store station.
- Press MEMORY again or wait 3 seconds for station to be stored in place.
AUTO BROWSE (SEMI-AUTO) STORAGE
- Enter VF mode, press and hold VF/VM button to scan available stations.
- The double arrowhead will flash while advancing and stopping on each available station for 5 seconds.
- Press the VF/VM button to store station into memory.
- It will then continue scanning until you store another choice or stop scanning.
AUTO-TUNING STORAGE (ATS)
FOR AM
- Enter VF mode Press and hold the AM button for 1 second.
- PRESET will flash and the radio runs through the band storing all available stations into memory.
- When storage is complete, the radio will begin broadcasting the first stored station.
- Rotating the course tuning dial will play each stored station as the dial is turned.
FOR FM
- Perform the same steps as you did for AM with two exceptions: fully extend the telescopic antenna and press and hold the FM button for 1 second.
FOR SW
- Perform the same steps as you did for FM with two exceptions: fully extend the telescopic antenna and press and hold the SW button for 1 second.
- Now choose whether to store all available frequencies within all meter bands or within a chosen meter band.
- Press and hold the down-arrowhead button to run through all available stations within all meter bands.
- Press and hold the up-arrowhead button to run through all available station within a given meter band.
MEMORY PAGE SELECTION
This allows you to chose what page and the location a station in memory is stored.
- Press FM, AM, or SW button for band selection.
- Tune to a desired station.
- Press the MEMORY button, the memory address flashes in upper right corner of display panel.
- Go to the PAGE buttons. Press the + to advance up in page number.
- Press the – to advance down in page number.
- Rotate the course tuning dial to choose your desired memory address location.
- Press the MEMORY button or wait 3 seconds for the new location of the memory address to be stored.
LISTENING TO STORED STATIONS
MANUALLY BROWSE STORED STATIONS
Press FM, AM, or SW button for band selection.
Press VF/VM button to enter VM mode.
Go to the PAGE buttons. Press the + to advance up in page number.
Press the – to advance down in page number.
Rotate course tuning dial to tune to a desired station within a memory page.
AUTO BROWSE (SEMI-AUTO) STORED STATIONS
- Press FM, AM, or SW button for band selection.
- Press VF/VM button to enter VM mode.
- Press and hold the VF/VM button until PRESET flashes in the upper right corner of the display panel.
- Go to the PAGE buttons.
- Press the + to advance up in page number.
- Press the – to advance down in page number.
- Rotate course tuning dial to tune to a desired station within a memory page.
- The radio will auto browse all stored stations in a selected page, staying on each for 5 seconds.
- Stop auto browsing by pressing VF/VM button or rotating course tuning dial.
DIRECT ENTRY OF STORED STATIONS
I will not cover this. Why? A person would need to remember the exact page and location of where each station is stored in memory. It is easier to AUTO BROWSE stored stations.
BANDWIDTH SELECTION WHILE LISTENING
- While listening on AM or SW, press the AM BW button.
- Press the AM BW button repeatedly to cycle through the options: 9, 5, 3.5 or 2.3 kHz of AM bandwidth.
- Stop pushing the AM BW button when your selection appears in the display.
- While listening on SW, choose either USB or LSB. USB or LSB will be displayed above the frequency.
- CORAC’s communications occur on USB of SW.
- Press the AM BW button repeatedly to cycle through the options: 4, 3, 2.3, 1.2, or 0.5 kHz of AM bandwidth.
- Stop pushing the AM BW button when your selection appears in the display.
- Select a higher number to widen the bandwidth when receiving strong signals or local stations.
- Select a lower number to narrow the bandwidth for weak signals or long-distance stations. Doing so will limit interference and reduce background noise.
DELETING STORED STATIONS
This function ONLY WORKS IF the delete button is pressed within 3 seconds. Otherwise, this function is exited with no changes saved.
MANUALLY DELETING A SINGLE STATION
- Rotate the course tuning dial to a stored station in memory.
- Press the DELETE button and release.
- PRESET and DEL will flash in upper right corner of display panel.
- Press the DELETE button again to remove the unwanted memory address.
AUTO BROWSE (SEMI-AUTO) DELETING A STORED STATION
- Enter VM mode Press and hold the VF/VM button.
- PRESET will flash and the radio will cycle through stored stations pausing for 5 seconds on each station.
- Press the DELETE button to remove unwanted stations in memory.
- Press and hold the VF/VM button to continue the process.
- If finished with the process, simply do not push the VF/VM button to stop.
MANUALLY DELETING ALL STATIONS WITHIN A PAGE
- Enter VM mode Press and hold the DELETE button for 3 seconds DEL and page number in upper right corner of display panel will flash.
- Note which page of stored memories you are on.
- Go to the PAGE buttons.
- Press the + to advance up in page number.
- Press the – to advance down in page number.
- Press DELETE button once more to delete all stored stations within a selected page.
- If the DELETE button is not pressed within 3 seconds for confirmation, the delete function exits automatically.
HIDDEN FEATURES OF THE TECSUN PL-880
There are quite a few. We will cover just four of the most important.
Adding seconds to the display panel clock.
Radio POWER OFF Press and hold the number 8 on the keypad.
Seconds will be displayed on the clock readout.
Use the same process to toggle between settings.
How to display all readouts in the display panel and radio’s firmware version.
Radio POWER OFF Press and hold the AM BW button.
The full display panel will turn on. Press and hold AM BW button again.
Radio firmware version will display in panel.
Synchronous Detection (SD)
Allows the radio to lock onto the USB or LSB of a radio signal, often improves reception. Reviews indicate the Tecsun PL880 SD has a problem providing a stable lock on a signal which produces unstable shifting audio (poor audio output). In those cases, it is better to turn off SD. Know that CORAC’s communications occur on USB.
- Radio POWER ON
- Select AM or SW button for band selection.
- Press and hold USB/NORM or LSB/NORM button until SYNC appears on display panel.
- Press the same button again to toggle SYNC off.
Dynamic Noise Reduction
- Allows the radio to reduce noise from a radio signal, often improves audio.
Radio POWER ON
- Press and hold the number 4.
- Additional features are enabled if display panel readout shows ON.
- If display panel readout shows OFF, press and hold the number 4 again.
- Press and hold the number 6.
- If display panel readout shows ON, dynamic noise reduction is on and enabled.
- If display panel readout shows OFF, dynamic noise reduction is off and disabled.


0 Comments